Tips
- For each project, planning first, so you can create a customized prompt file or chat mode to do this planning job, like specify read-only access to the codebase
- Start small, keeping the initial project-wide context concise and focused on the most critical information.
⭐ Context Engineering
Context engineering is a systematic approach to providing AI agents with targeted project information to improve the quality and accuracy of generated code.
- INPUT: custom instructions, implementation plans, and coding guidelines
- OUTPUT: better decisions, improve accuracy, and maintain persistent knowledge across interactions.
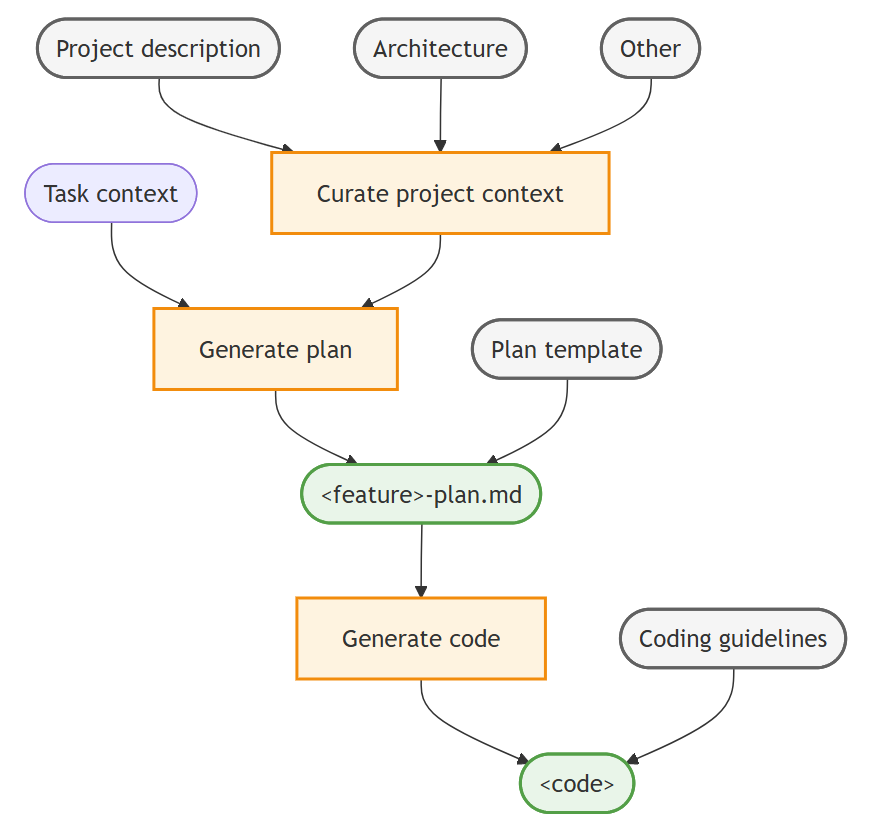
Context engineering workflow
- Curate project-wide context: include relevant documentation (for example, architecture, design, contributor guidelines) as context to all agent interactions.
- Generate implementation plan: create a planning persona by using a custom chat mode and a prompt to generate a detailed feature implementation plan.
- Generate implementation code: generate code based on the implementation plan that adheres to your coding guidelines.
Curate project-wide context
Target: To ground the AI agent in the specifics of the project
How: collect key project information, like product vision, architecture, and other relevant documentation and add it as chat context
- ensure that the agent consistently has access to this context and doesn’t have to re-learn it for each chat interaction
Best Practices:
- Describe relevant project documentation in Markdown files in the repository, for example:
- PRODUCT.md: the product functionality of the project
- CONTRIBUTING.md: developer guidelines and best practices for contributing to the project
- ARCHITECTURE.md: overall architecture of the project
- Create a
.github/copilot-instructions.mdinstructions file at the root of your repository.- This file is automatically included as context for all agent interactions in the repository.
- In this file, provide a high-level overview for the agent with the project context and guidelines.
- Reference relevant supporting documentation files by using Markdown links.
## Create Implementation Plan

Prerequest: Project-specific context

Next: Use AI to prompt the creation of an implementation plan for a new feature.

# [Project Name] Guidelines

* [Product Vision and Goals](../PRODUCT.md): Understand the high-level vision and objectives of the product to ensure alignment with business goals.
* [System Architecture and Design Principles](../ARCHITECTURE.md): Overall system architecture, design patterns, and design principles that guide the development process.
* [Contributing Guidelines](../CONTRIBUTING.md): Overview of the project's contributing guidelines and collaboration practices.

Suggest to update these documents if you find any incomplete or conflicting information during your work.
Create implementation plan
Target: use AI to prompt the creation of an implementation plan for a new feature or bug fix under the project-wide context.
To make the generated plan more organized and structured, you can create a planning document template plan-template.md that defines the structure and sections of the implementation plan document.
---
title: [Short descriptive title of the feature]
version: [optional version number]
date_created: [YYYY-MM-DD]
last_updated: [YYYY-MM-DD]
---
# Implementation Plan: <feature>
[Brief description of the requirements and goals of the feature]

## Architecture and design
Describe the high-level architecture and design considerations.

## Tasks
Break down the implementation into smaller, manageable tasks using a Markdown checklist format.

## Open questions
Outline 1-3 open questions or uncertainties that need to be clarified.
Keyboard Shortcuts
You can trigger Ghost Text by writing a comment expressing what you want.
- To enable inline chat, press
Command+I. - To open Chat View, press
Command+Shift+I. - To make a quick chat, press
Shift+Option+Command+I. - To accept all the Ghost text, press
Tab. - To accept the Ghost by word, press
Command+Right Arrow.
Copilot - Predefined Actions
From helping you write commit messages or pull requests descriptions, renaming code symbols, fixing errors in the editor, to semantic search that helps you find relevant files.
Export Chat: export all prompts and responses for a chat session in a JSON
- Active the chat you want to export.
- Open the command palette (
Command+Shift+P). - Search for
Chat: Export Chat.
Others:
@workspace: use the whole project workspace as the basis to answer this request.#FILENAME: pointing copilot to a specific file/explain: explain the selected code/doc: add documentation comment for this symbol./tests: generate unit tests for the selected code/fix: propose a fix for the problems in the selected code
Various Chat Modes
Ask mode is great for asking questions about your codebase, coding and general technology concepts.
- Best for: Understanding of your codebase, brainstorming, Q&A
- Context Level: Diverse
- Change Level: Low
Edit Mode is optimized for making code edits across multiple files
- Best for: Refactoring, add new features, fix bugs, unit tests, improve code quality or performance
- Context Level: High
- Change Level: Medium
Agent Mode is optimized for high-level task, which might involve multiple steps and iterations to complete.
- Best for: Refactoring, add new features, Generate an implementation plan for a complex task
- Context Level: Autonomously determine the relevant context and files to edit
- Change Level: High
⭐️ Edit Mode VS Agent Mode:
- Edit scope: you might use edit mode if your request involves only code edits and you know the precise scope for the changes.
- Duration: agent mode involves multiple steps to process a request, so it might take longer to get a response. For example, to determine the relevant context and files to edit, determine the plan of action, and more.
- Non-deterministic: agent mode evaluates the outcome of the generated edits and might iterate multiple times. As a result, agent mode can be more non-deterministic than edit mode.
- Request quota: in agent mode, depending on the complexity of the task, one prompt might result in many requests to the backend.
Copilot Context Control
By providing the right context, you can get more relevant and accurate responses.
- By default, the currently selected text and the file name of the active editor are used as context.
- For
ask modeoredit mode, the active file is used as context. - For
agent mode, the agent tools automatically determine if the active file needs to be added to the context.
#-mentions
Symbol # enables you to refer to specific context in your codebase.
- Simply add
#codebasein your prompt to enable code search for your entire workspace. - Reference Web Content
#fetch: type#fetchfollowed by a URL of the page you want to reference.- Example: Update the asp.net app to .net 9 #fetch https://learn.microsoft.com/en-us/aspnet/core/migration/80-90"
- Reference Github Repositories
#githubRepo:#githubRepofollowed by the URL of theUsername/repository name.- Example: Add unit tests for my app. Use the same test setup and structure as #githubRepo rust-lang/rust
@-mentions
This symbol is used to invoke a specific chat participant.
Example: @terminal what are the top 5 largest files in the current directory
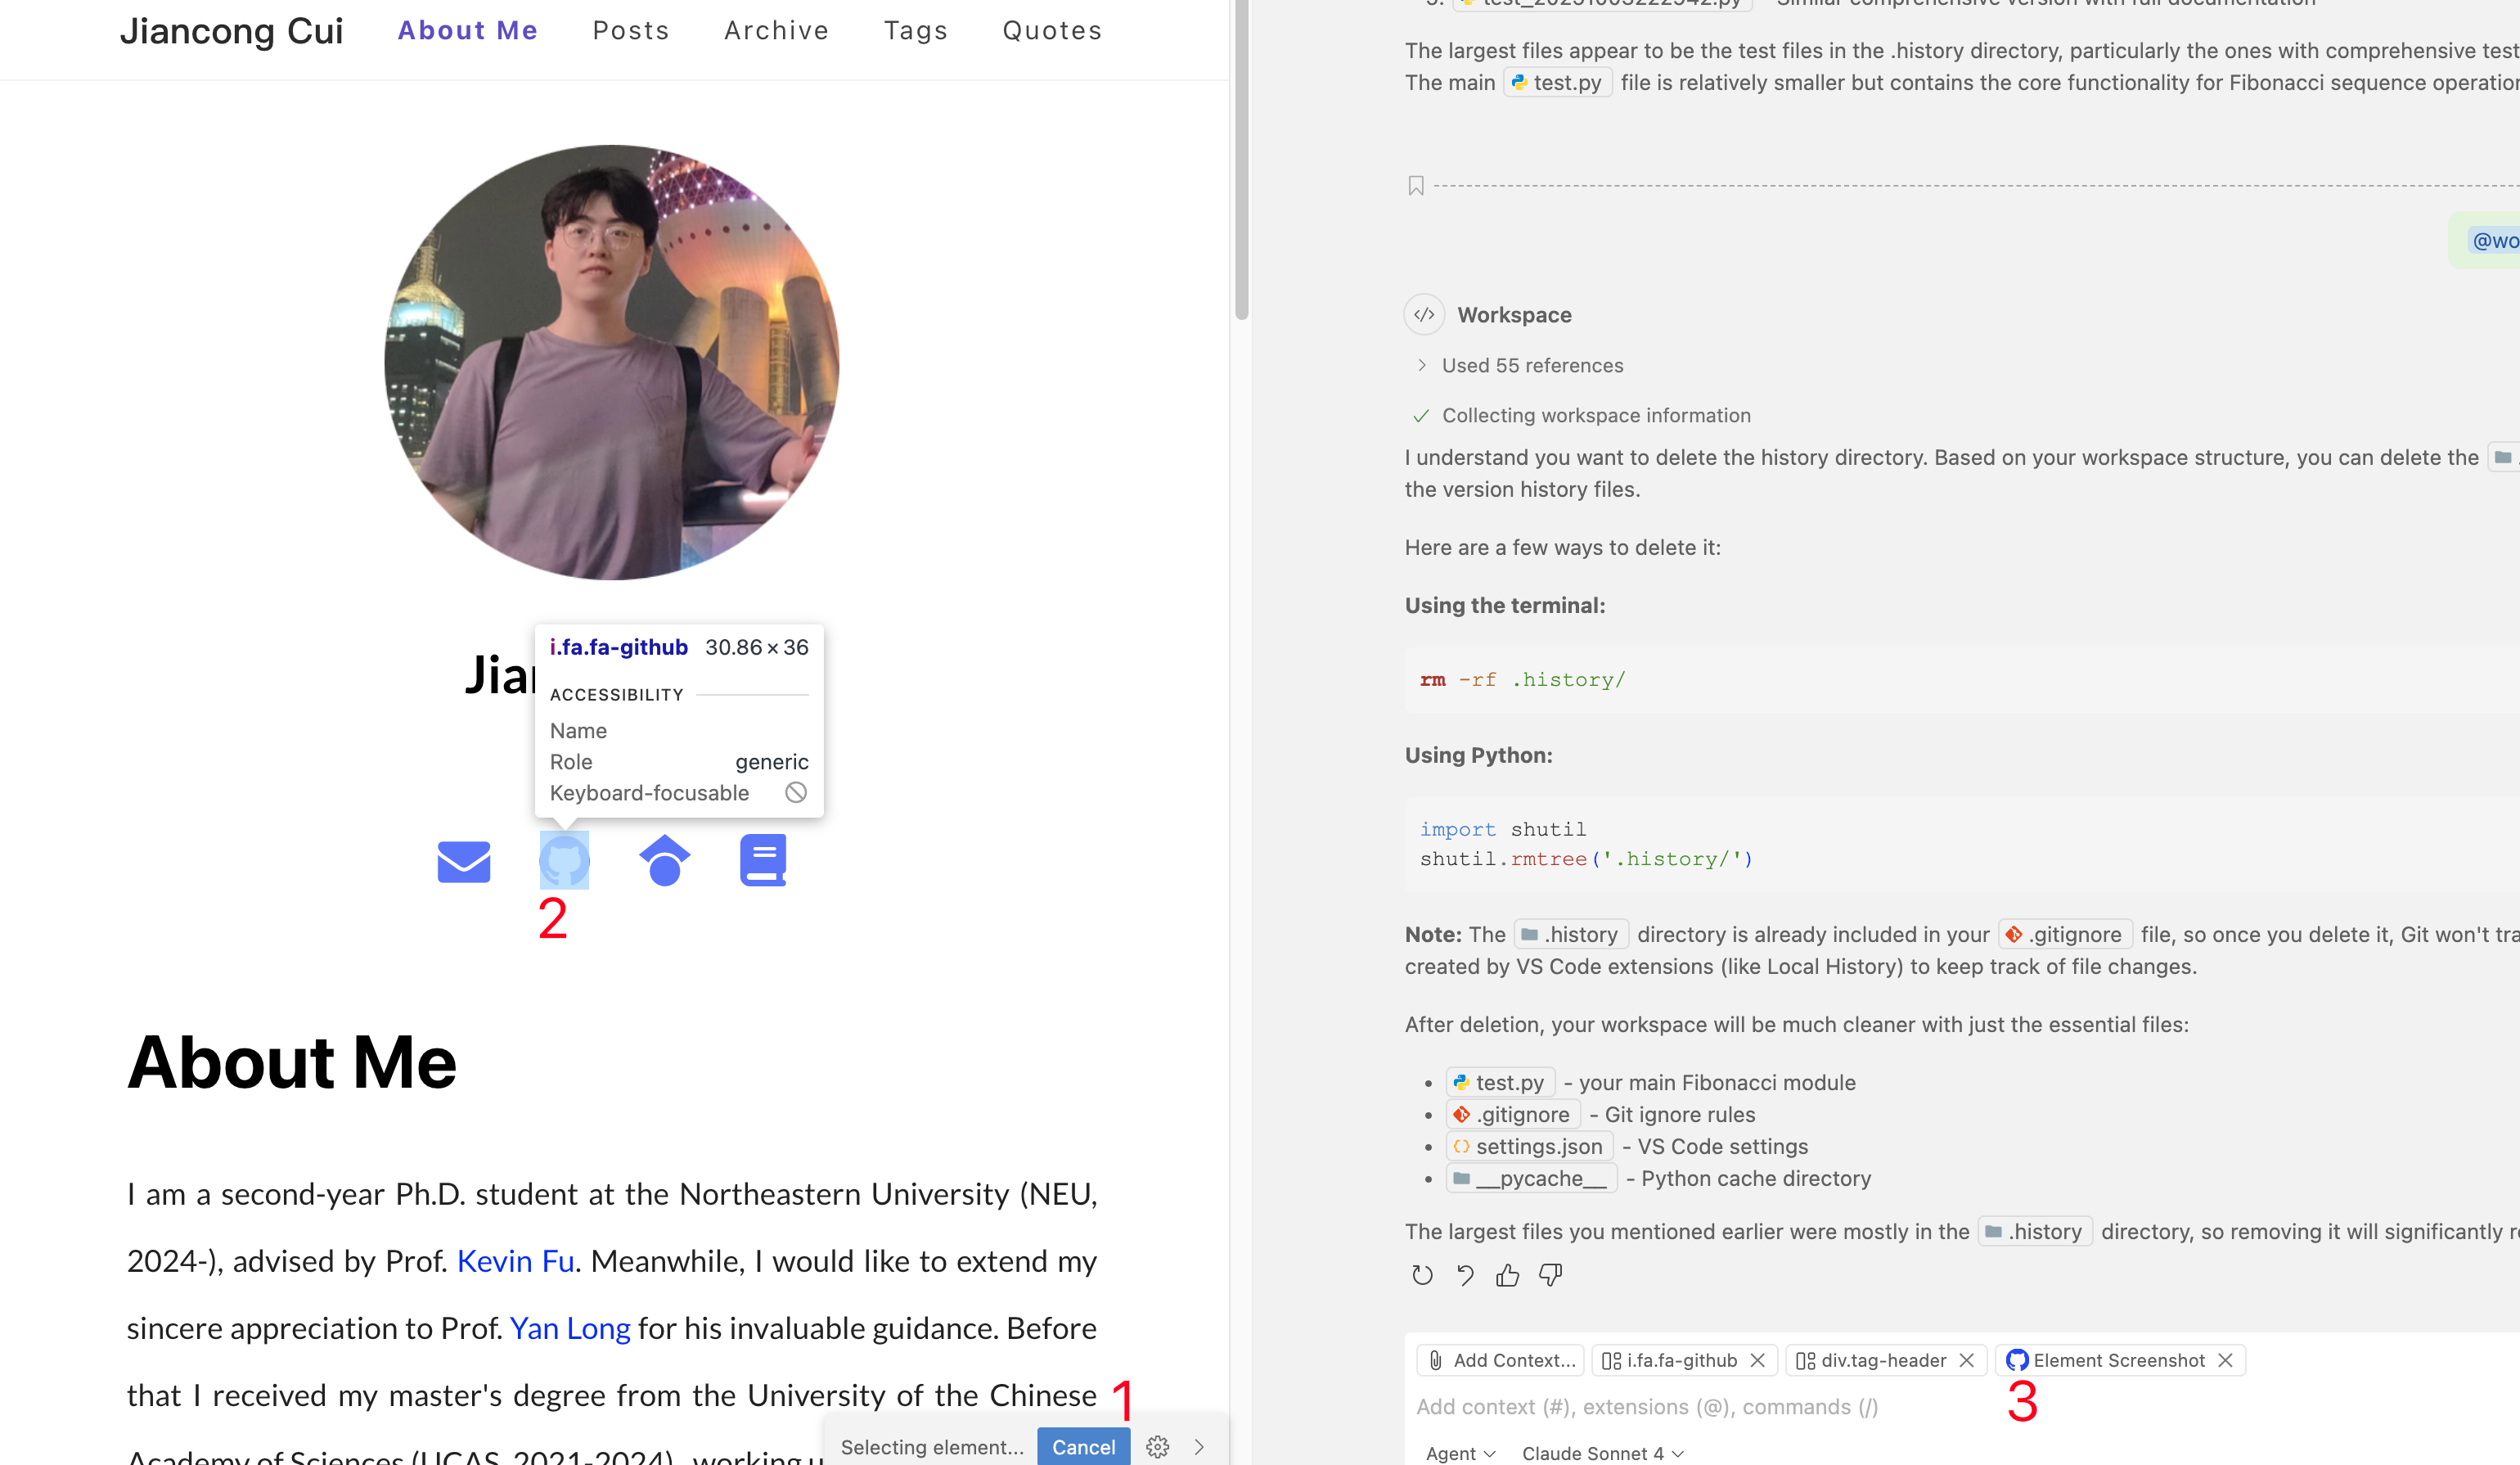
Interact with Embeded Browser
Scenario: While you are developing a web application, you want to do a tiny change in the UI, to make it into the context, you can use the embeded browser to quickly reference the specific UI.
- Open the Simple Browser Show:
Command+Shift+P->Simple Browser: Show - Enter the URL of your web application.
http://localhost:4000/ - Click and select the specific UI you want to reference.
Agent Mode
Use instructions to get AI edits that follow your coding style
Instruction files enable you to describe your coding style and preferences in Markdown files, which the AI uses to generate code edits that match your requirements.
---
applyTo: "**"
---
# Project general coding standards

## Naming Conventions
- Use PascalCase for component names, interfaces, and type aliases
- Use camelCase for variables, functions, and methods
- Prefix private class members with underscore (_)
- Use ALL_CAPS for constants

## Error Handling
- Use try/catch blocks for async operations
- Implement proper error boundaries in React components
- Always log errors with contextual information
Prompt Files
Prompt files enable you to create reusable prompts that can be used. You can create multiple prompt files for various tasks, such as generating components, writing tests, or refactoring code.
Tips for defining prompt files
- Clearly describe what the prompt should accomplish and what output format is expected.
- Provide examples of the expected input and output to guide the AI’s responses.
- Use Markdown links to reference custom instructions rather than duplicating guidelines in each prompt.
- Take advantage of built-in variables like ${selection} and input variables to make prompts more flexible.
- Use the editor play button to test your prompts and refine them based on the results.
Two types of prompt files:
- Workspace prompt files: Are only available within the workspace and are stored in the .github/prompts folder of the workspace.
- User prompt files: Are available across multiple workspaces and are stored in the current VS Code profile.
Prompt files are Markdown files and use the .prompt.md extension and have this structure:
- Header (optional): YAML frontmatter
- Body: Prompt instructions in Markdown format
- Reference other workspace files, prompt files, or instruction files by using Markdown links (relative paths).
- Reference variables by using the
${variableName}syntax.- Workspace variables - ${workspaceFolder}, $
- Selection variables - ${selection}, $
- File context variables - ${file}, ${fileBasename}, ${fileDirname}, $
- Input variables - ${input:variableName}, ${input:variableName:placeholder} (pass values to the prompt from the chat input field)
Example:
---
mode: 'agent'
model: GPT-4o
tools: ['githubRepo', 'search/codebase']
description: 'Generate a new React form component'
---
Your goal is to generate a new React form component based on the templates in #githubRepo contoso/react-templates.

Ask for the form name and fields if not provided.

Requirements for the form:
* Use form design system components: [design-system/Form.md](../docs/design-system/Form.md)
* Use `react-hook-form` for form state management:
* Always define TypeScript types for your form data
* Prefer *uncontrolled* components using register
* Use `defaultValues` to prevent unnecessary rerenders
* Use `yup` for validation:
* Create reusable validation schemas in separate files
* Use TypeScript types to ensure type safety
* Customize UX-friendly validation rules
When you create a prompt file, choose whether to store it in your workspace or user profile. Workspace prompt files apply only to that workspace, while user prompt files are available across multiple workspaces.
Other Features
- Define your own chat modes: Link
💡 References
Todo:
- Context Engineering ⭐
- Use custom instructions in VS Code
- Smart Actions
- Tips and Tricks
- MCP (later)
- Edit Notebooks with AI (later)
- Test with AI (later)
- Debug with AI (later)
- MCP Dev Guide (later)