LLVM
编译器: 把人类可读的高级语言映射到机器执行码
LLVM 设计理念: 模块化, 使得每一个编译阶段都被独立出来
- LLVM 使用 C++ 完成, 并为编译器开发人员提供了易用而丰富的编程接口和 API, 所以 LLVM 是相对容易学习的编译器框架
- 与其他编译器(如 GNU Compiler Collection, GCC)不同, LLVM 的设计目标是成为一系列的库
LLVM 汇编码
三种形式: 内存编译器中的 IR, 存于磁盘的 bitcode, 用户可读的汇编码
LLVM IR 基于 SSA (Static Single Assignment——SSA) 并且提供了类型安全性、底层操作性、灵活性, 因此能够清楚表达绝大多数高级语言, 致力于成为一种足够底层的通用 IR
OPT
LLVM 优化器(optimizer), 其基于库的设计, 允许你选择各个 Pass 的执行顺序, 也能够选择执行哪些优化
Pass
- 表明有一些优化对你设计的系统是没有帮助的, 只有少数优化会针对你的系统
- 在 LLVM 中, 如果你想了解特定的优化器, 是不需要知道整个系统是如何工作的。你只需选择一个优化器并使用它, 无须担心其他依赖它的组件
1 Quick Start
- 原始文件
01testfile.ll
define i32 @test1(i32 %A) {
    %B = add i32 %A, 0
    ret i32 %B
}

define internal i32 @test(i32 %X, i32 %dead) {
    ret i32 %X
}

define i32 @caller() {
    %A = call i32 @test(i32 123, i32 456)
    ret i32 %A
}- 使用
-instcombine进行优化, 实现Combine redundant instructions
opt-8 -S -instcombine 01testfile.ll -o 01testfile.-instcombine.ll可以看到 @test1 函数中的冗余加法指令 add i32 %A, 0 被优化了
; ModuleID = '01testfile.ll'
source_filename = "01testfile.ll"

define i32 @test1(i32 %A) {
  ret i32 %A
}

; ...- 使用
-deadargelim进行优化, 实现Dead Argument Elimination
opt-8 -S -deadargelim 01testfile.ll -o 01testfile.-deadargelim.ll可以看到 @test 函数中的无用参数 i32 %dead 被优化掉了
; ...

define internal i32 @test(i32 %X) {
  ret i32 %X
}

define i32 @caller() {
  %A = call i32 @test(i32 123)
  ret i32 %A
}
OPT Pass
LLVM 优化器为用户提供了不同的优化 Pass, 但整体的编写风格一致:
- 对每个 Pass 的源码编译, 得到一个 Object 文件, 之后这些不同的文件再链接得到一个库
- Pass 之间耦合很小, Pass 之间的依赖信息由 LLVM Pass 管理器(PassManager)来统一管理, 在 Pass 运行的时候会进行解析
下面的图片展示了每个 Pass 如何关联到指定库中的特定的 Object 文件:
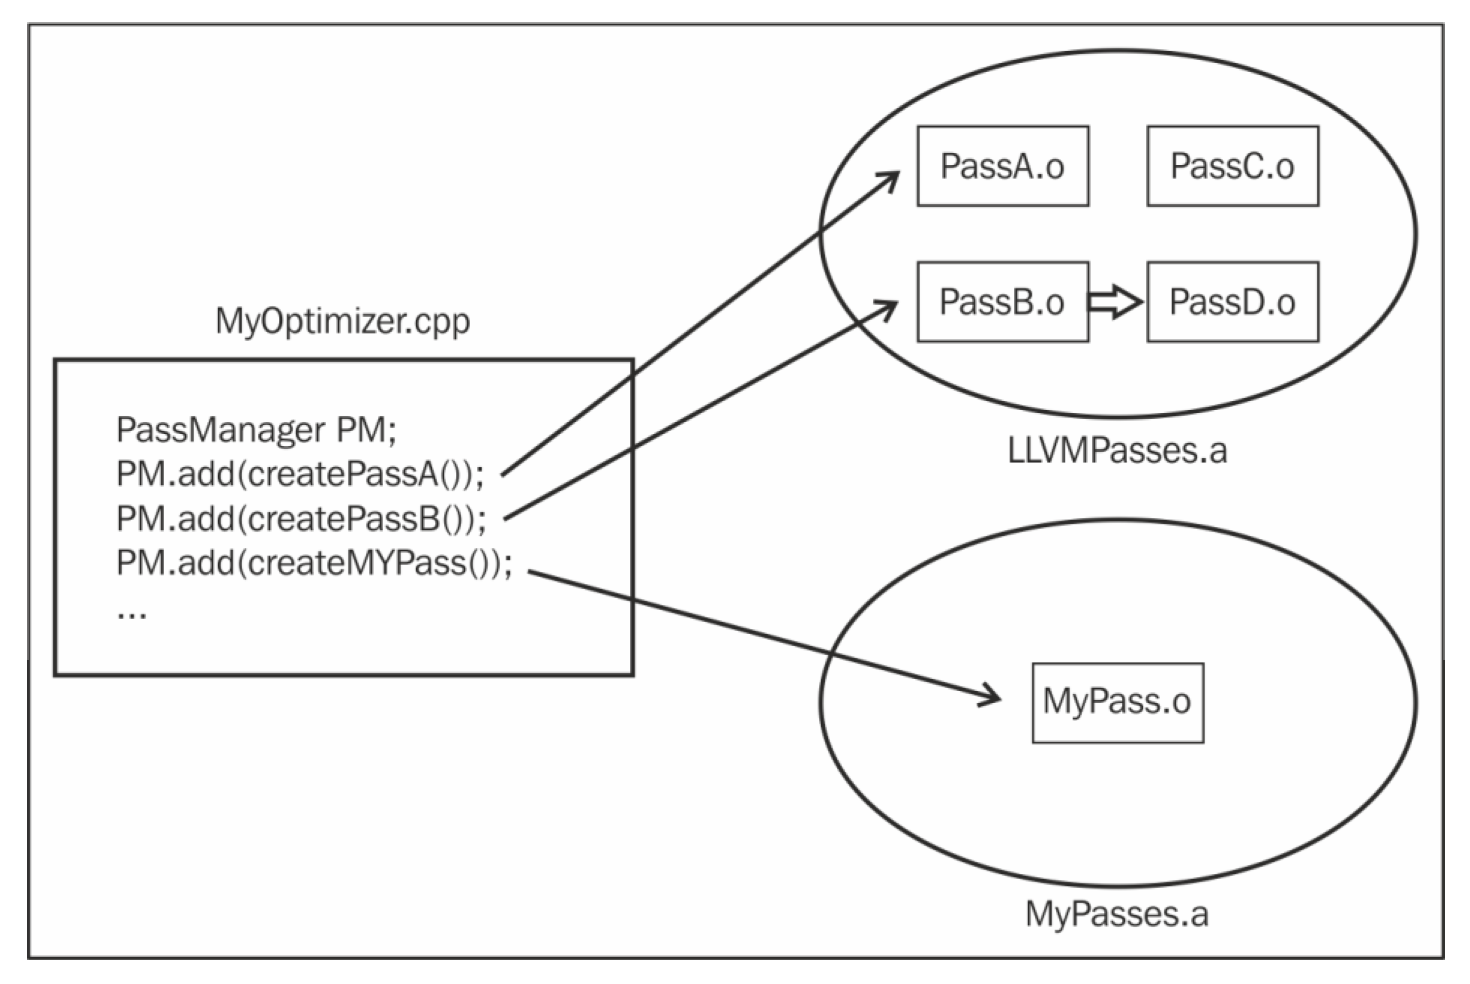
可以理解为 PassA 中 PassA.o 引用了 LLVMPasses.a, 而自定义的 Pass 中 MyPass.o 引用了不同的库, 即 MyPasses.a
Code Generator
LLVM 代码生成器(code generator)也采用了模块的设计理念:
- 将代码生成问题分解为多个独立 Pass:指令选择、寄存器分配、指令调度、代码布局优化、代码发射
- 同样, 也有许多内建的 Pass, 它们默认执行, 但用户可以选择只执行其中一部分
交叉编译
交叉编译, 指的是我们能够在一个平台(例如x86)编译并构建二进制文件, 而在另一个平台(例如ARM)运行
- 编译二进制文件的机器称为主机(host), 而运行生成的二进制文件的平台我们称为目标平台(target)
- 为相同平台(主机与目标机器相同)编译代码我们称为本机编译, native assembler
- 为不同平台(主机与目标机器不同)编译代码则称为交叉编译, cross-compiler
CMD Quick Start
2 C to LLVM IR
简要流程: 使用 clang 前端将 C 转为 IR
- 词法分析: 将 C 语言源码分解成 token 流, 每个 token 可表示标识符、字面量、运算符等
- 语法分析: token 流会传递给语法分析器, 语法分析器会在语言的CFG(Context Free Grammar, 上下文无关文法)的指导下将 token 流组织成AST(抽象语法树)
- 语义分析: 检查语义正确性, 然后生成 IR
- 示例 C 代码
int mult() {
    int a = 5;
    int b = 3;
    int c = a * b;
    return c;
}- 使用
clang将 C 转为 LLVM IR
clang-8 -emit-llvm -S 02multiply.c -o 02multiply.ll; ModuleID = '02multiply.c'
source_filename = "02multiply.c"
target datalayout = "e-m:e-i64:64-f80:128-n8:16:32:64-S128"
target triple = "x86_64-pc-linux-gnu"
; Function Attrs: noinline nounwind optnone uwtable
define dso_local i32 @mult() #0 {
%1 = alloca i32, align 4
%2 = alloca i32, align 4
%3 = alloca i32, align 4
store i32 5, i32* %1, align 4
store i32 3, i32* %2, align 4
%4 = load i32, i32* %1, align 4
%5 = load i32, i32* %2, align 4
%6 = mul nsw i32 %4, %5
store i32 %6, i32* %3, align 4
%7 = load i32, i32* %3, align 4
ret i32 %7
}
attributes #0 = { noinline nounwind optnone uwtable "correctly-rounded-divide-sqrt-fp-math"="false" "disable-tail-calls"="false" "less-precise-fpmad"="false" "min-legal-vector-width"="0" "no-frame-pointer-elim"="true" "no-frame-pointer-elim-non-leaf" "no-infs-fp-math"="false" "no-jump-tables"="false" "no-nans-fp-math"="false" "no-signed-zeros-fp-math"="false" "no-trapping-math"="false" "stack-protector-buffer-size"="8" "target-cpu"="x86-64" "target-features"="+fxsr,+mmx,+sse,+sse2,+x87" "unsafe-fp-math"="false" "use-soft-float"="false" }
!llvm.module.flags = !{!0}
!llvm.ident = !{!1}
!0 = !{i32 1, !"wchar_size", i32 4}
!1 = !{!"clang version 8.0.1-svn363027-1~exp1~20190611211629.77 (branches/release_80)"}- 或者使用
cc1实现 C 向 LLVM IR 的转换
Tips: 是 cc1, 数字 1, 不是字母 L
clang-8 -cc1 -emit-llvm 02multiply.c -o 02multiply-ccl.ll通过下面的 IR 可以看出, IR 的代码风格有所不一致
; ModuleID = '02multiply.c'
source_filename = "02multiply.c"
target datalayout = "e-m:e-i64:64-f80:128-n8:16:32:64-S128"
target triple = "x86_64-pc-linux-gnu"

; Function Attrs: noinline nounwind optnone
define i32 @mult() #0 {
entry:
  %a = alloca i32, align 4
  %b = alloca i32, align 4
  %c = alloca i32, align 4
  store i32 5, i32* %a, align 4
  store i32 3, i32* %b, align 4
  %0 = load i32, i32* %a, align 4
  %1 = load i32, i32* %b, align 4
  %mul = mul nsw i32 %0, %1
  store i32 %mul, i32* %c, align 4
  %2 = load i32, i32* %c, align 4
  ret i32 %2
}

attributes #0 = { noinline nounwind optnone "correctly-rounded-divide-sqrt-fp-math"="false" "disable-tail-calls"="false" "less-precise-fpmad"="false" "min-legal-vector-width"="0" "no-frame-pointer-elim"="false" "no-infs-fp-math"="false" "no-jump-tables"="false" "no-nans-fp-math"="false" "no-signed-zeros-fp-math"="false" "no-trapping-math"="false" "stack-protector-buffer-size"="8" "target-features"="+mmx,+sse,+sse2,+x87" "unsafe-fp-math"="false" "use-soft-float"="false" }

!llvm.module.flags = !{!0}
!llvm.ident = !{!1}

!0 = !{i32 1, !"wchar_size", i32 4}
!1 = !{!"clang version 8.0.1-svn363027-1~exp1~20190611211629.77 (branches/release_80)"}
3 LLVM IR to bitcode
LLVM Bitecode, 也称为字节码 (bytecode), 由两部分组成:
- 位流, bitstream, 可类比字节流
- 编码格式: 将 LLVM IR 编码成位流的编码格式
llvm-as 是 LLVM 的汇编器, 将 LLVM IR 转为 bitcode (可以理解为将普通的汇编码转为可执行文件)
在将 LLVM IR 转为 bitcode 过程中, 引入了区块(block)和记录(record)的概念:
- 区块: 表示位流的区域, 例如一个函数体、符号表等; 每个区块的内容都对应一个特定的 ID, 例如 LLVM IR 中函数体的 ID 是 12
- 记录: 由一个记录码和一个整数值组成, 描述了在指令、全局变量描述符、类型描述中的实体
LLVM IR 的 bitcode 文件由一个简单的封装结构封装, 结构包括一个描述文件段落偏移量的简单描述头, 以及内嵌 BC 文件的大小
- 准备示例的 LLVM IR
define i32 @mult(i32 %a, i32 %b) #0 {
    %1 = mul nsw i32 %a, %b
    ret i32 %1
}- 使用
llvm-as将 LLVM IR 转为 bitcode 格式
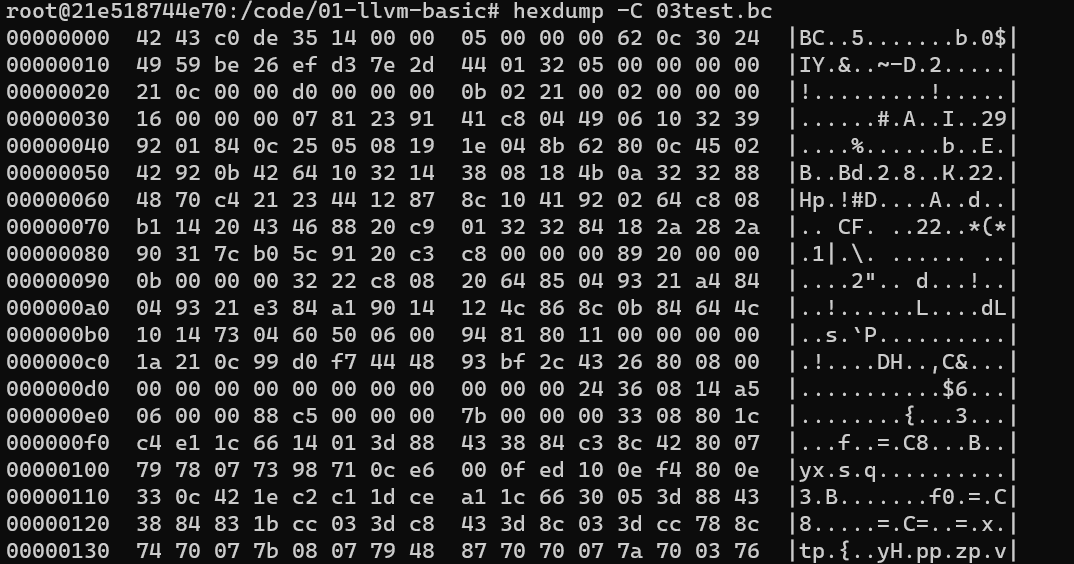
llvm-as-8 03test.ll -o 03test.bc- 使用
hexdump工具查看 bitcode 二进制文件
4 LLVM bitcode to ASM
将 LLVM bitcode 文件转换为目标平台的汇编代码
-
使用 上一个实验的输出 03test.bc 作为本实验的输入
-
使用
llc实现 bitcode2asm
- 输入格式支持
.bc与.ll
# 默认的适配架构由本机决定
llc-8 03test.bc -o 04test.s
- 查看汇编文件, 汇编的格式为 AT&T 格式
        .text
        .file   "03test.ll"
        .globl  mult                    # -- Begin function mult
        .p2align        4, 0x90
        .type   mult,@function
mult:                                   # @mult
        .cfi_startproc
# %bb.0:
        movl    %edi, %eax
        imull   %esi, %eax
        retq
.Lfunc_end0:
        .size   mult, .Lfunc_end0-mult
        .cfi_endproc
                                        # -- End function

.section ".note.GNU-stack","",@progbits- 或者使用
clang实现 bitcode2asm
clang-8 -S 03test.bc -o 04test_clang.s -fomit-frame-pointer
# fomit-fram-pointer 开启消除函数栈帧顶指针功能, clang 默认是关闭此选项的, llc 默认是开启的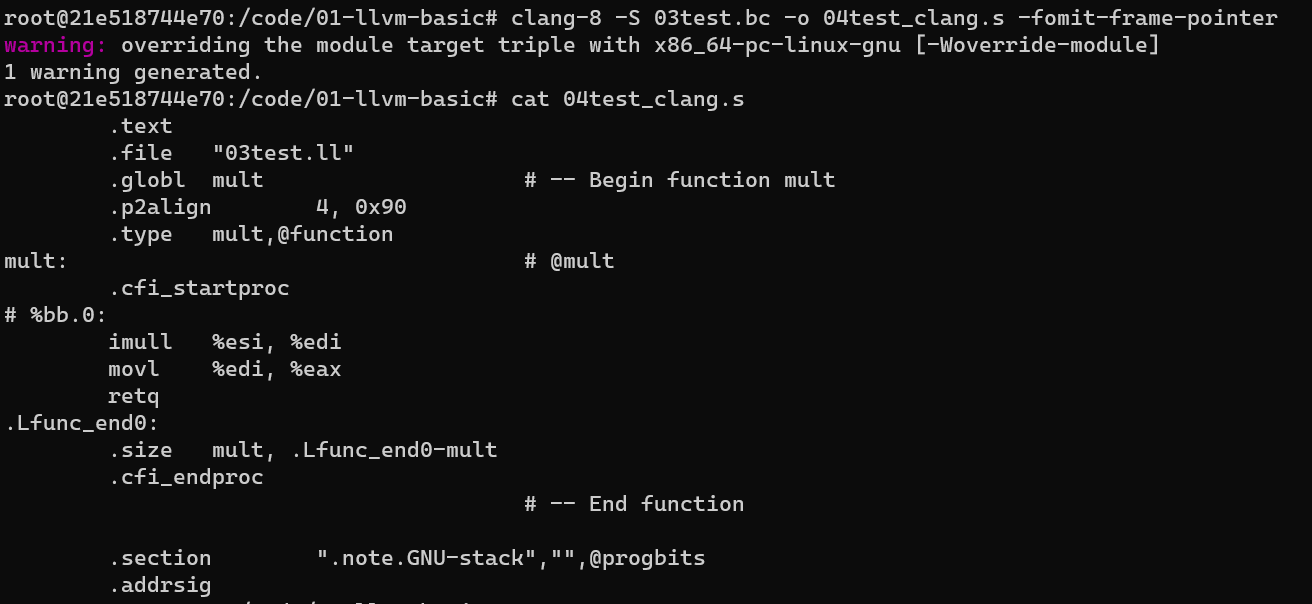
指定架构
可以使用 -march 执行具体的 CPU 架构
特别的, x86 架构有两种汇编风格, AT&T 与 intel, 这个需要通过 -x86-asm-syntax=[att|intel] 来指定
llc-8 -march=x86-64 -x86-asm-syntax=intel 03test.bc -o 04test_intel.s
通过 llc --version 可以查看 -march 参数可选的值
LLVM (http://llvm.org/):
  LLVM version 8.0.1

  Optimized build.
  Default target: x86_64-pc-linux-gnu
  Host CPU: (unknown)

  Registered Targets:
    aarch64    - AArch64 (little endian)
    aarch64_be - AArch64 (big endian)
    amdgcn     - AMD GCN GPUs
    arm        - ARM
    arm64      - ARM64 (little endian)
    armeb      - ARM (big endian)
    avr        - Atmel AVR Microcontroller
    bpf        - BPF (host endian)
    bpfeb      - BPF (big endian)
    bpfel      - BPF (little endian)
    hexagon    - Hexagon
    lanai      - Lanai
    mips       - MIPS (32-bit big endian)
    mips64     - MIPS (64-bit big endian)
    mips64el   - MIPS (64-bit little endian)
    mipsel     - MIPS (32-bit little endian)
    msp430     - MSP430 [experimental]
    nvptx      - NVIDIA PTX 32-bit
    nvptx64    - NVIDIA PTX 64-bit
    ppc32      - PowerPC 32
    ppc64      - PowerPC 64
    ppc64le    - PowerPC 64 LE
    r600       - AMD GPUs HD2XXX-HD6XXX
    sparc      - Sparc
    sparcel    - Sparc LE
    sparcv9    - Sparc V9
    systemz    - SystemZ
    thumb      - Thumb
    thumbeb    - Thumb (big endian)
    wasm32     - WebAssembly 32-bit
    wasm64     - WebAssembly 64-bit
    x86        - 32-bit X86: Pentium-Pro and above
    x86-64     - 64-bit X86: EM64T and AMD64
    xcore      - XCore
5 LLVM bitcode to LLVM 汇编码
使用 llvm-dis (LLVM 反汇编器) 实现 LLVM bitcode (.bc) 转回 LLVM IR (.ll)
llvm-dis-8 03test.bc -o 05test.ll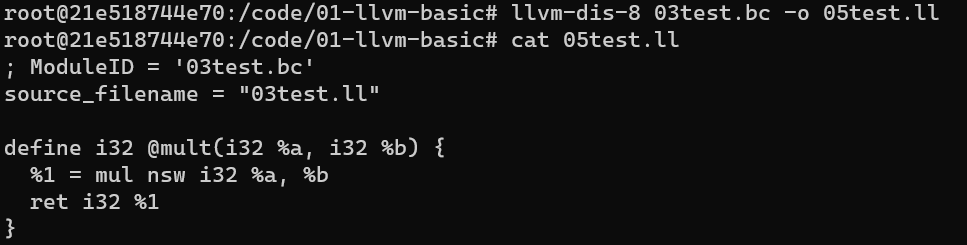
6 IR Transform
主要利用 opt 工具实现 IR 形式的转化与代码的优化
opt-8 -mem2reg -S 02multiply.ll -o 06multiply.-mem2reg.ll-mem2reg: 主要优化内存访问, 将局部变量从内存提升到寄存器
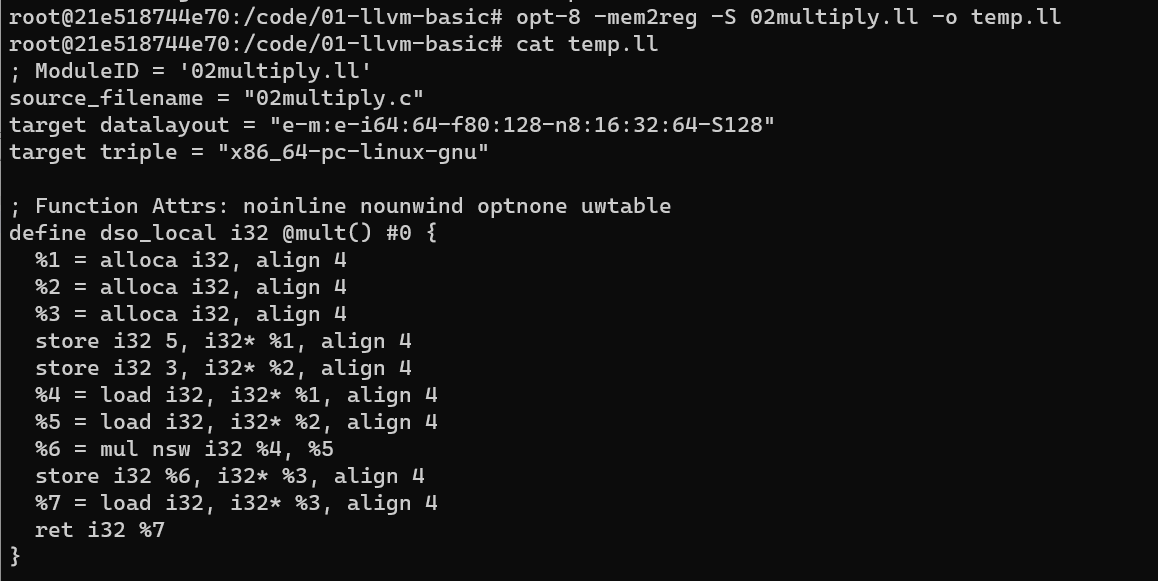
如上图所示, 这里按照书中的步骤执行会发现 -mem2reg 并没有任何效果, 这是因为 clang 将 c 转为 ll 时默认的优化级别时 O0, 这个级别会为生成汇编码中的每个函数添加一个属性 optnone 显示的阻断后续的优化 pass

为了避免这个问题, 需要在 clang 转换时添加属性 -Xclang -disable-O0-optnone 将 “封印解除” 就可以单独进行 -mem2reg 的优化并看到效果了
clang-8 -emit-llvm -S 06multiply.c -Xclang -disable-O0-optnone -o 06multiply.ll
opt-8 -mem2reg -S 06multiply.ll -o 06multiply.-mem2reg.ll
cat 06multiply.-mem2reg.ll
7 链接 LLVM bitcode
llvm-link 的功能和传统的链接器一致: 如果一个函数或者变量在一个文件中被引用, 却在另一个文件中定义, 那么链接器就会解析这个文件中引用的符号, 只不过其针对的是 llvm bitcode 文件而非 object
- 准备如下两个文件, 准备进行连接
// 07test1.c
int func(int a) {
    a = a * 2;
    return a;
}

// 07test2.c
#include<stdio.h>
extern int func(int a);
int main() {
    int num = 5;
    num = func(num);
    printf("number is %d\n", num);
    return num;
}- 将 C 转为 LLVM bitcode (位流文件格式): c -> ll -> bc
clang-8 -emit-llvm -S 07test1.c -o 07test1.ll
clang-8 -emit-llvm -S 07test2.c -o 07test2.ll
llvm-as-8 07test1.ll -o 07test1.bc
llvm-as-8 07test2.ll -o 07test2.bc
此时 test2.bc 引用了 test1.bc 文件中的 func 函数
- 使用
llvm-link命令链接两个 LLVM bitcode 文件
llvm-link-8 07test1.bc 07test2.bc -o 07test_linked.bc- 可以使用
—S参数, 让llvm-link直接输出 LLVM IR 文件
llvm-link-8 -S 07test1.bc 07test2.bc -o 07test_linked.ll
8 执行 LLVM bitcode
使用 lli 工具以 LLVM bitcode 为输入, 使用即时编译器 (JIT) 实现 LLVM bitcode 的执行
- 如果当前的架构不存在 JIT 编译器,会用解释器执行
lli 07test_linked.bc即可执行

9 C 与 Clang
Clang 能够作为预处理器、编译器驱动、前端以及代码生成器使用,它的输出取决于你指定的参数
- 使用
clang将 C 转为可执行文件
clang-8 09test.c -o 09test.out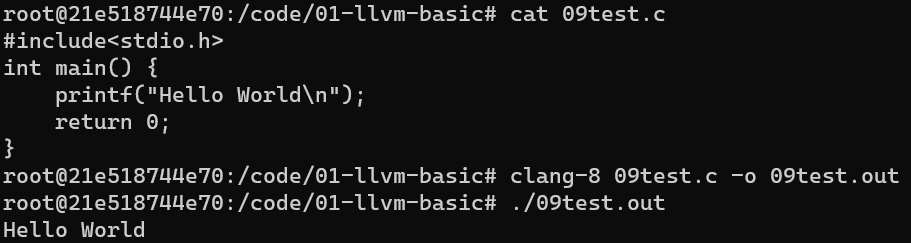
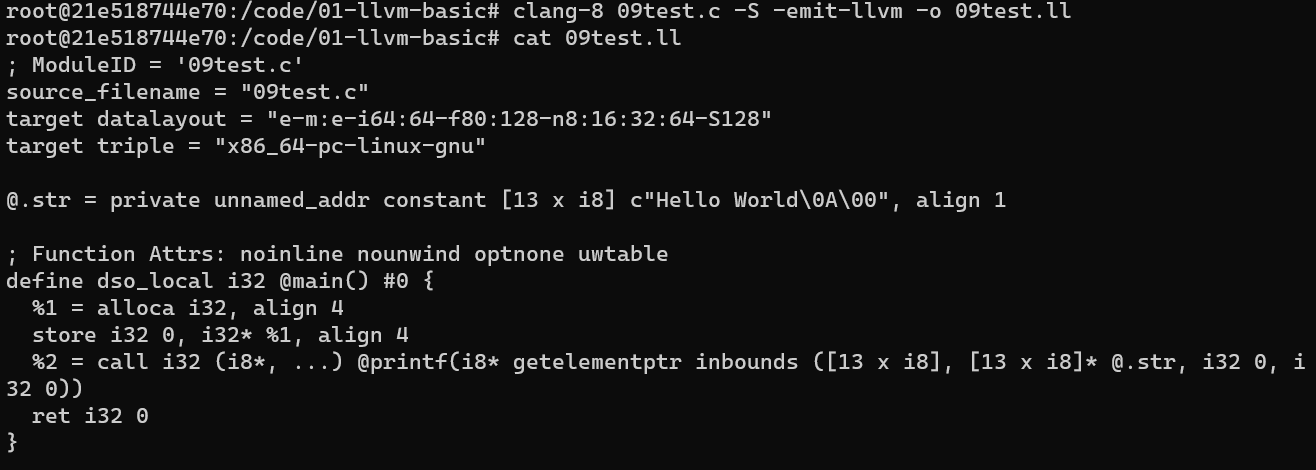
- 添加
-S -emit-llvm选项, 将 C 转为 LLVM 汇编码
clang-8 09test.c -S -emit-llvm -o 09test.ll-S: 表示 Only run preprocess and compilation steps
-emit-llvm: 表示 Use the LLVM representation for assembler and object files
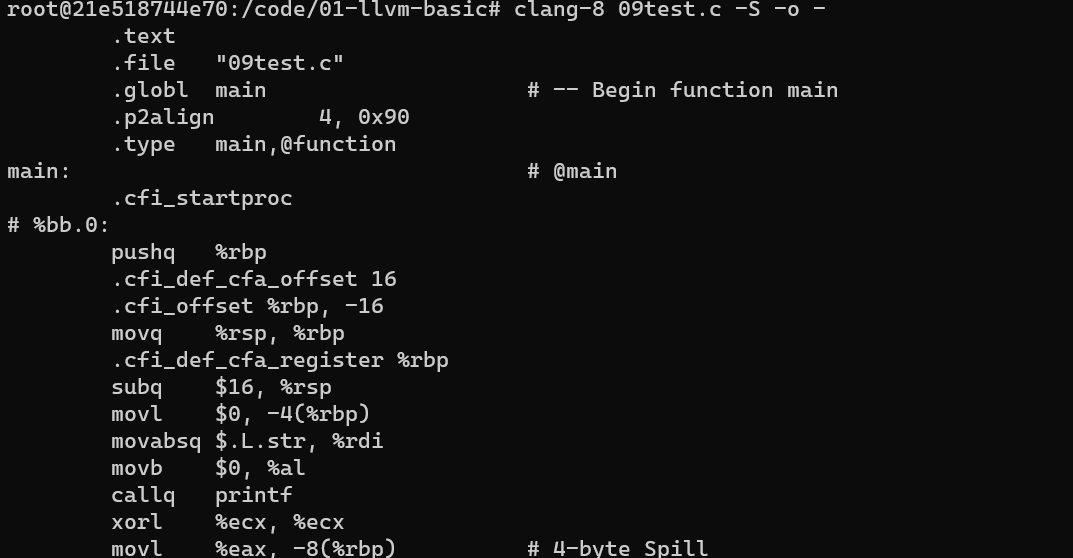
- 仅添加
-S选项, 就能实现 C 转为汇编码
clang-8 09test.c -S -o --o -: 将结果再标准输出中输出
Refs
- [llvm-cookbook]